
I began this task by buying several shower curtains and making a pattern out of the small brown bear rug to use as a proportion reference. I then purchased a large amount of polar bear fleece from Joann’s, which I sewed into a large rectangle which would fit into the basic dimensions of the polar bear without the arms and legs. Using the juvenile brown bear pattern (dubbed “baby bear”), I drew the size and proportion of the polar bear I would be constructing on another set of shower curtains. I showed this to the director for approval so he had an accurate idea of how the bear would look on stage. Before cutting out the fabric, I began work on the head, because I thought I could modify the fabric if the head was inadvertently larger or smaller than anticipated. I began by making a chicken wire frame, which I could build up bit by bit to insure structural stability. Once the frame was constructed, I sealed the bottom and sides with plaster strips. I used spray foam on the top of the head (which was open) to insure that the structure I created was light weight but sturdy. I then used Plaster of Paris to begin roughly shaping the more intricate details, such as the hollows of the eyes and the bridge of the nose. Once the plaster was dry, I continued to layer and add detail with cheap modeling clay and finally a thin layer of stone clay for additional strength. For the tongue, I took a sheet of wire mesh, shaped it into the contours I wanted, and covered it in clay. I then attached it into the mouth. I worried the actors would inadvertently kick the teeth out of the bear’s mouth, so I made them out of a solid chunk of Ladoll stone clay. It was very labor-intensive, but by the time the teeth had cured, you could kick the bear in the mouth without damaging the teeth. Once the head was done, I proceeded to paint the details that would be showing under the fur, as well as modge podge the entire bear’s head in hard coat to provide further strength. I cut out the fur using my pattern as well as referencing the size of the head and hot glued the fur to the head. As the polar bear fleece was very thin, I plushed it up with a thick gauze fleece as a lining. For the polar bear’s claws, I used mold clay to form flexible, curved claws that the actors could step on without breaking.


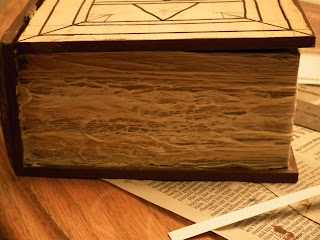
 For our box assignment, I was assigned to build a straw book jewelry box. I was given a sheet with dimensions and an image of the box I would make. I began work by constructing a wooden box using plywood with the dimensions of the assignment. Next, I searched for a material to use for the straw decoration. I initially wanted to use split straw, as I find the best way to mimic a material is to use the material, but I was unable to obtain any. I experimented using synthetic raffia ribbon and found that it worked well for the pages of the book but that it was too hard to use on the detailed panels on the top of the box. In the end, I decided to use strips of card stock, cut into strips and pieces to make the pattern on the top of the box. I found it necessary to modify the pattern from it's original design, as the dimensions I was given didn't appear to match the dimensions in the photo. I tried to stay true to the original design. First I gave the box an undercoat of dark brown paint to match the color of the photo of the box. I then glued the cardstock pieces to top and side of the box and began the painstaking process of painting it. Finally, I added dark brown lines between each of the pieces of cardstock so the pattern would be more visible to the audience.


